Basic Armenian Embroidery Stitches
I thank my sister Ankine, who taught me Armenian embroidery. One day, she insisted on teaching me. I was surprised by how quickly I learned and completed several pieces on my own. The stitch may look complicated, but once you understand how it is done, the work becomes easy, enjoyable, and rewarding. Also, it is very important that one tries and tries again.
Included here are various stitches reproduced from the book entitled “Marashi Aseghnagordsoutyune” (The Needlework of Marash) by Serig Davtyan, published in Armenian in 1978 in Erevan. Additionally, some pages were reproduced from “Armenian Needlelace and Embroidery” by Alice Odian Kasparian.
You will need a design and a fairly thick cotton thread or DMC thread. I will cover the steps of how to draw your own design at home in the next section, without using any complex machines or tools. The designs are printed on the fabric in different ways; some are stamped onto the fabric with carved wooden stamps, while others are painted onto the fabric with a brush or a steel pen dipped in a special paste.
The design may also be drawn at home on a clear plastic sheet or translucent paper for easy positioning; the plastic or the paper is then perforated along the design lines to allow paint to penetrate into the fabric, and the plastic sheet is then painted along the perforations while it is held against the fabric. The design method will be explained in more detail below.
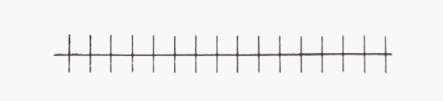
To start learning the basic embroidery stitching, you need to draw a line (using a pencil or colored pen) just like the line below on a piece of white cloth. You also need a thread and needle to practice. Remember practice, practice, and practice. Practice makes perfect.
1st step: Work a row of herringbone or fishbone stitch just like the picture below.
2nd step: Work a second row. The foundation must be correct, otherwise the 3rd and 4th steps cannot be worked accurately. Each bar of the herringbone on both ends should be either over or under the stitches. Make bars once over and once under alternately to the end, just like the picture below.
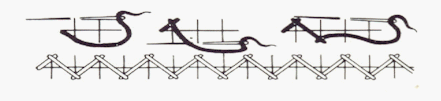
3rd step: Work the top row of interlacing by threading the up-slanting stitches underneath the others, just like the picture below.
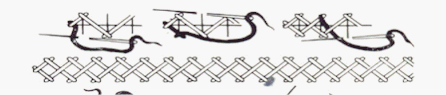
4th step: Work the bottom row of interlacing by threading the down-slanting stitches underneath the others, following the exact direction of the stitches, just like the picture below.
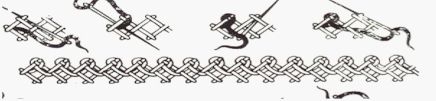
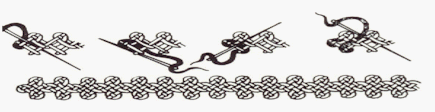
The first row of the fishbone stitches has the second row superimposed upon it. While working the second row of fishbone stitches, the needle is passed under the working thread of each stitch instead of over it. The base of the foundation of the first and second rows should not be worked tightly, because in interlacing the threads superimposed on the first and second rows, the weaving thread tends to draw the stitches together. The third row is worked by filling in the upper or lower outline with a darning-type stitch.
The fourth row completes the process by weaving in and out of each stitch until the work is completed. Marash Embroidery is a very precise embroidery. There can be no errors in working it, or the weaving will not come out perfect. The first and second fishbone stitches are the foundation stitches and will show on the back; all the rest of the weaving is done on the surface. While working on the third and fourth row, do not pierce the fabric. Slide the needle between the fabric and the existing stitch.
In the Encyclopedia of Embroider Stitches by Marion Nichols, you can see a description of this stitch, which the author calls German Interlacing or Maltese Interlacing. Regardless of what it is called, this stitch is derived from Armenia.
After you have practiced these basic stitches, follow the designs below to make more complicated patterns.
Different Designs
These are different designs that you can try to practice after you have mastered the basic stitches above. You can click on the link below to see different designs and an explanation of each design.